Thursday, April 28, 2011

I believe we are going to good direction.

With Dolf's help, the script goes to be better and better, so this is today's result.
Oh, this is almost Dolf's code. :-(

<CODE>

# Here is how we do things separately for every face!
# In a very very simple way.


# Get access to blender through bpy and get the active object
import bpy
ob = bpy.context.active_object


# A new trick... lets go into edit mode and deselect everything ('SELECT' works too)
bpy.ops.object.mode_set(mode='EDIT')
bpy.ops.mesh.select_all(action='DESELECT')


# Now just like before we loop through all the faces, but we don't just select/deselect, we add them to a list...


# Go into object mode so that we are sure we have the current list of faces 
bpy.ops.object.mode_set(mode='OBJECT')


# Make a fresh new empty list to put your faces in
faceList = []


# Now loop through all the faces
for i, f in enumerate(ob.data.faces):


# The index of every 5th face will be added to the list
# if i % 5 == 0:
faceList.append(f.index)


# NOW WE LOOP THROUGH THE LIST
for index in faceList:

# Make sure we are in object mode so we can select the current face in the list
bpy.ops.object.mode_set(mode='OBJECT')

# Select this face
print('selecting',index)
ob.data.faces[index].select = True

# NOW WE CAN DO WHATEVER WE WANT TO THIS FACE

# Go into edit mode for editing!
bpy.ops.object.mode_set(mode='EDIT')

# Just for fun... lets make a loop that extrudes and shrinks the face 5 times
for i in range(2):

# Extrude the current Face (We use 'REGION' because 'FACES' only works with multiple faces selected)
bpy.ops.mesh.extrude(type='REGION')

# Here's the really hacky part... to make sure the shrink works correct.. we go in and out of object mode
# That way the mesh "updates" nicely after the extrude... I do not want to do this... but it works
bpy.ops.object.mode_set(mode='OBJECT')
bpy.ops.object.mode_set(mode='EDIT')

# Transform selected faces. tValue = move
tValue = -0.2
bpy.ops.transform.shrink_fatten(value=tValue, mirror=False, proportional='DISABLED', proportional_edit_falloff='SMOOTH', proportional_size=1, snap=False, snap_target='CLOSEST', snap_point=(0, 0, 0), snap_align=False, snap_normal=(0, 0, 0), release_confirm=False)

bpy.ops.transform.resize(value=(0.766402, 0.766402, 0.766402), constraint_axis=(False, False, False), constraint_orientation='GLOBAL', mirror=False, proportional='DISABLED', proportional_edit_falloff='SMOOTH', proportional_size=0.0762767, snap=False, snap_target='CLOSEST', snap_point=(0, 0, 0), snap_align=False, snap_normal=(0, 0, 0), texture_space=False, release_confirm=False)


# Now if we are done with this face... we deselect it, and anything else that might be selected (outside the 5 long loop)
bpy.ops.mesh.select_all(action='DESELECT')


bpy.ops.object.modifier_apply(apply_as='DATA', modifier="Subsurf")
bpy.ops.object.editmode_toggle()
bpy.ops.object.modifier_add(type='SUBSURF')
bpy.ops.object.modifier_apply(apply_as='DATA', modifier="Subsurf")
bpy.ops.object.modifier_add(type='SUBSURF')


bpy.ops.object.shade_smooth()

</CODE>

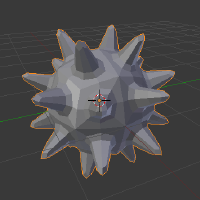
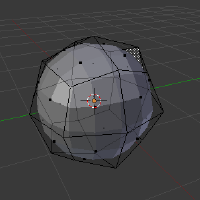
'Seed' object was 'Torus, 36 Major Segment, 9 Minor Segment'. How about this? I think it's a big big step. I didn't use 'Rotate' code, it'll be more complex shapes.


Wednesday, April 27, 2011

I got a good result!

Today, I tried again, I got a good result. (^_^)
I don't know why I couldn't get this result yesterday, maybe it's cause of my mistakes.

Thanks Dolf, We could advance the project to next level. (^_^)

<CODE>

# So lets go do some face selecting in Blender 3D using the python api.
# I will give a few very simple examples

# BE AWARE THAT FOR THESE EXAMPLES YOU MUST HAVE A MESH SELECTED AND IN OBJECT MODE!
# AND FOR TESTING USE ONE OF THE EXAMPLES AT A TIME.

# First import bpy to get access to well... everything in blender
import bpy

# Now we want to get the active object
# To do this we go through bpy.context... because that is basicly "what you are working on right now"
# bpy.data could work too, but then you'd need to do more work to find your current active object
ob = bpy.context.active_object

# MAKE SURE WE ARE IN OBJECT MODE FOR SELECTING
bpy.ops.object.mode_set(mode='OBJECT')

# SELECTING EVERY OTHER FACE

# Lets loop through all the faces in the mesh
for i, f in enumerate(ob.data.faces):
# See if the current iteration/number i is odd or even
if i % 5 == 0:
# Set select to true
f.select = True
else:
f.select = False

# MAKE SURE WE ARE IN EDIT MODE FOR EXTRUDE AND TRANSLATE
bpy.ops.object.mode_set(mode='EDIT')

# Extrude the selection (do not move it)
bpy.ops.mesh.extrude(type='FACES')

# Get the screen areas we are working in right now
areas = bpy.context.screen.areas

# Loop through all the areas
for area in areas:

# See if the current area is a 3D view
if area.type == 'VIEW_3D':

# Set the pivot point to individual origins
area.active_space.pivot_point = 'INDIVIDUAL_ORIGINS'

# Transform selected faces. tValue = move
tValue = -1.0
bpy.ops.transform.shrink_fatten(value=tValue, mirror=False, proportional='DISABLED', proportional_edit_falloff='SMOOTH', proportional_size=1, snap=False, snap_target='CLOSEST', snap_point=(0, 0, 0), snap_align=False, snap_normal=(0, 0, 0), release_confirm=False)

# Resize the Extruded Faces. sValue = scale
sValue = 0.7
bpy.ops.transform.resize(value=(sValue,sValue,sValue), constraint_axis=(True, True, True), constraint_orientation='LOCAL', mirror=False, proportional='DISABLED', proportional_edit_falloff='SMOOTH', proportional_size=0.0762767, snap=False, snap_target='CLOSEST', snap_point=(0, 0, 0), snap_align=False, snap_normal=(0, 0, 0), texture_space=False, release_confirm=False)

# Set to the Object mode
bpy.ops.object.editmode_toggle()

</CODE>

1. Add a Cube, and deselect the all faces in [Edit] mode. Then return to [Object] mode.


2. Run the script, I got this result.


Of course, if I deselect the all faces in script first, the process of deselecting all faces in (1.)are no needed.

Tuesday, April 26, 2011

Trouble? Bug?

I tried some scripts with help by Dolf, the pivot point could change to 'INDIVIDUAL_ORIGINS'. But, surely it's changed, I couldn't resize each faces with

<CODE>

bpy.ops.transform.resize(value=(0.7, 0.7, 0.7), constraint_axis=(True, True, True), constraint_orientation='LOCAL', mirror=False, proportional='DISABLED', proportional_edit_falloff='SMOOTH', proportional_size=0.0762767, snap=False, snap_target='CLOSEST', snap_point=(0, 0, 0), snap_align=False, snap_normal=(0, 0, 0), texture_space=False, release_confirm=False)

</CODE>

Why??? Is it a bug or something?

I'll try next way, 'Select one face, extrude, and resize. Because, in selecting many faces, the resize operation seems with 'Bounding box center', so if single face is selected, the center of resize will be set to 'the face center', I think. How about this.

Sunday, April 24, 2011

Not 'REGION', extrude 'FACES' !

I tried a part of Arindam's script. (Thanks, Arindam.)

<CODE>

# So lets go do some face selecting in Blender 3D using the python api.
# I will give a few very simple examples


# BE AWARE THAT FOR THESE EXAMPLES YOU MUST HAVE A MESH SELECTED AND IN OBJECT MODE!
# AND FOR TESTING USE ONE OF THE EXAMPLES AT A TIME.


# First import bpy to get access to well... everything in blender
import bpy


# Now we want to get the active object
# To do this we go through bpy.context... because that is basicly "what you are working on right now"
# bpy.data could work too, but then you'd need to do more work to find your current active object
ob = bpy.context.active_object


# MAKE SURE WE ARE IN OBJECT MODE FOR SELECTING
bpy.ops.object.mode_set(mode='OBJECT')


# SELECTING FACES POINTING UP


# Import the math and mathtutils so we can work with vectors and such
import math, mathutils


# Make a vector (direction) pointing up
up = mathutils.Vector((0.0,0.0,1.0))


# Lets loop through all the faces in the mesh
for f in ob.data.faces:


# If the angle between up and the face's normal (direction) is smaller than 45... 
# The face must be pointing up
# To compare the angle we need 45 degrees in radians, not in degrees!
# Math with angles is usually all in radians
if f.normal.angle(up) < math.radians(45):
# Set select to true
f.select = True
else:
f.select = False
 
# MAKE SURE WE ARE IN EDIT MODE FOR EXTRUDE AND TRANSLATE
bpy.ops.object.mode_set(mode='EDIT')


# Extrude the selection (do not move it)
bpy.ops.mesh.extrude(type='FACES')


# Move the selection (always relative to the normal)
# bpy.ops.transform.translate(0.1) 

bpy.ops.transform.shrink_fatten(value=-0.1, mirror=False, proportional='DISABLED', proportional_edit_falloff='SMOOTH', proportional_size=1, snap=False, snap_target='CLOSEST', snap_point=(0, 0, 0), snap_align=False, snap_normal=(0, 0, 0), release_confirm=False)

</CODE>

And, I got this result.


Add subSurf modifier. 


Next, I'd like to resize each selected, extruded faces on Pivot='Individual Origins'. But now, I couldn't find the option in

<CODE>

bpy.ops.transform.resize(value=(0.5, 0.5, 0.5), constraint_axis=(False, False, False), constraint_orientation='GLOBAL', mirror=False, proportional=bpy.context.tool_settings.proportional_edit, proportional_edit_falloff=bpy.context.tool_settings.proportional_edit_falloff, proportional_size=1, snap=bpy.context.tool_settings.use_snap, snap_target=bpy.context.tool_settings.snap_target, snap_point=(0, 0, 0), snap_align=False, snap_normal=(0, 0, 0), release_confirm=False)

</CODE>

hmmm, what is the answer?

Friday, April 22, 2011

Select, Extrude, and Move?

I'm trying this code. But after extrude part, nothing to happen.
What's wrong?

<code>

# So lets go do some face selecting in Blender 3D using the python api.
# I will give a few very simple examples


# BE AWARE THAT FOR THESE EXAMPLES YOU MUST HAVE A MESH SELECTED AND IN OBJECT MODE!
# AND FOR TESTING USE ONE OF THE EXAMPLES AT A TIME.


# First import bpy to get access to well... everything in blender
import bpy


# Now we want to get the active object
# To do this we go through bpy.context... because that is basicly "what you are working on right now"
# bpy.data could work too, but then you'd need to do more work to find your current active object
ob = bpy.context.active_object


# SELECTING FACES POINTING UP


# Import the math and mathtutils so we can work with vectors and such
import math, mathutils


# Make a vector (direction) pointing up
up = mathutils.Vector((0.0,0.0,1.0))


# Lets loop through all the faces in the mesh
for f in ob.data.faces:


# If the angle between up and the face's normal (direction) is smaller than 45...
# The face must be pointing up
# To compare the angle we need 45 degrees in radians, not in degrees!
# Math with angles is usually all in radians
   if f.normal.angle(up) < math.radians(45):
     # Set select to true
     f.select = True
   else:
     f.select = False


# Extrude the selection (do not move it)
  def extrude(self):
     bpy.ops.mesh.extrude(type='REGION')
  # Move the selection (always relative to the normal)
  # val = (0, 0, 1.0)
     def translate(self, val):
         bpy.ops.transform.translate(value=val, constraint_axis=(False, False, False), constraint_orientation='GLOBAL', mirror=False, proportional=bpy.context.tool_settings.proportional_edit, snap=bpy.context.tool_settings.use_snap, release_confirm=False)

</code>

Oh, about def, I got it. That's for function. How is next?


<code>

# So lets go do some face selecting in Blender 3D using the python api.
# I will give a few very simple examples

# BE AWARE THAT FOR THESE EXAMPLES YOU MUST HAVE A MESH SELECTED AND IN OBJECT MODE!
# AND FOR TESTING USE ONE OF THE EXAMPLES AT A TIME.

# First import bpy to get access to well... everything in blender
import bpy

# Now we want to get the active object
# To do this we go through bpy.context... because that is basicly "what you are working on right now"
# bpy.data could work too, but then you'd need to do more work to find your current active object
ob = bpy.context.active_object


# SELECTING FACES POINTING UP

# Import the math and mathtutils so we can work with vectors and such
import math, mathutils

# Make a vector (direction) pointing up
up = mathutils.Vector((0.0,0.0,1.0))

# Lets loop through all the faces in the mesh
for f in ob.data.faces:

# If the angle between up and the face's normal (direction) is smaller than 45...
# The face must be pointing up
# To compare the angle we need 45 degrees in radians, not in degrees!
# Math with angles is usually all in radians
   if f.normal.angle(up) < math.radians(45):
     # Set select to true
     f.select = True
   else:
     f.select = False

# Extrude the selection (do not move it)
bpy.ops.mesh.extrude(type='REGION')

# Move the selection (always relative to the normal)
bpy.ops.transform.translate(value=(0, 0, 1.0), constraint_axis=(False, False, False), constraint_orientation='GLOBAL', mirror=False, proportional=bpy.context.tool_settings.proportional_edit, snap=bpy.context.tool_settings.use_snap, release_confirm=False)

</code>


Hmmm, I got an error for 'extrude' part.  :-(
And try next,


<code>

# So lets go do some face selecting in Blender 3D using the python api.
# I will give a few very simple examples

# BE AWARE THAT FOR THESE EXAMPLES YOU MUST HAVE A MESH SELECTED AND IN OBJECT MODE!
# AND FOR TESTING USE ONE OF THE EXAMPLES AT A TIME.

# First import bpy to get access to well... everything in blender
import bpy

# Now we want to get the active object
# To do this we go through bpy.context... because that is basicly "what you are working on right now"
# bpy.data could work too, but then you'd need to do more work to find your current active object
ob = bpy.context.active_object


# SELECTING FACES POINTING UP

# Import the math and mathtutils so we can work with vectors and such
import math, mathutils

# Make a vector (direction) pointing up
up = mathutils.Vector((0.0,0.0,1.0))

# Lets loop through all the faces in the mesh
for f in ob.data.faces:

# If the angle between up and the face's normal (direction) is smaller than 45...
# The face must be pointing up
# To compare the angle we need 45 degrees in radians, not in degrees!
# Math with angles is usually all in radians
   if f.normal.angle(up) < math.radians(45):
     # Set select to true
     f.select = True
   else:
     f.select = False

# Add This line ---
bpy.ops.object.editmode_toggle()     

# Extrude the selection (do not move it)
bpy.ops.mesh.extrude(type='REGION')

# Move the selection (always relative to the normal)
bpy.ops.transform.translate(value=(0, 0, 1.0), constraint_axis=(False, False, False), constraint_orientation='GLOBAL', mirror=False, proportional=bpy.context.tool_settings.proportional_edit, snap=bpy.context.tool_settings.use_snap, release_confirm=False)

</code>

I got extruded shape!


Thursday, April 21, 2011

A little one step.

Trying Dolf's script. At first, I got an error, and Dolf told me about Python's Indent. Check and try again. Oh, I got it. A little bit, I advanced. Python script, it's a interesting. :-)

1. There are no selected face. (The script works on Object mode)

2. Run Script.

3. Into Edit mode. Some faces are selected.

This script contains some 'Selection Style', this result is applied the last one in the script.

What I tried yesterday.

I tried some struggle for understanding.


  1. Just try, select four top vertices and make 'vertex group' on a cube.
  2. Deselect all vertices.
  3. Open the 'report' window.
  4. In a 'Vertex Group' tab, push 'Select' button, of course the four vertices of the group was selected. See the report window, I could see 'bpy.ops.object.vertex_group_select()'.
  5. Copy it and paste to the script window.
  6. Deselect all vertices again for test.
  7. Push 'Run Script' button.
  8. On the screen, four vertices were selected!


It's a very little one step for me.  :-)

Wednesday, April 20, 2011

The 1st step

Yes, this project got some powerful cooperators and supporters, let's begin!

At first, I have to learn 'How to get one or some target(s) face', and 'How to extrude it(them)'. This two issues are most 'basically' important for this project. I'm still searching the answers on the net, but I didn't find good sites. Anybody know good tutorial sites or documents for it?

I think at first, the face is selected from a 'plane' object.


Monday, April 18, 2011

Start New Project


Generative Modeling?

If I make this object by usual hand operation, I need only very easy a few steps like these,
  1. Add cube on 3d window.
  2. Add subSurf modifier.
  3. Apply the subSurf.
  4. Into Edit mode.
  5. Select all faces.
  6. Hit [opt]+[E] keys, select [Individual].
  7. Set pivot point to [Individual origins].
  8. Hit [s] to resize the faces.
  9. Repeat 6. and extrude a little bit.
  10. Resize some.
  11. Add subSurf modifier.
It's very easy. And I'm thinking, "Can I make this 'Automatically'? Maybe, it's enable. Use python!". I tried it in my poor knowledge, like this.

code:
import bpy


bpy.ops.mesh.primitive_cube_add()
bpy.ops.object.modifier_add(type='SUBSURF')
bpy.ops.object.modifier_apply(apply_as='DATA', modifier="Subsurf")


bpy.ops.object.editmode_toggle()
bpy.ops.mesh.select_all(action='TOGGLE')


The result is this,
OK, sounds good, and next. Next? How can I do that? I don't know how to select the all or special faces. If I'd got the way, it's very useful. Because, 'my' method of modeling is continuous simple commands, select, extrude, resize, rotate, move. For example, I make many 'Spike' shape, but each spike is made with some, maybe two or three times, steps of extrude and resize.
Maybe you'll say, 'Well, you have to study python and blender API more and more.' Yes, it is right. I have to learn much, I know.

I think this 'Generative Modeling' method has full of abilities, for Visualizing scientific data, using as VJ tools and more, so very important and interesting theme. I have some modeling technique (of course by hand), if you have python, blender API knowledges and some interest this project, please help me and let's go together.

- Shige